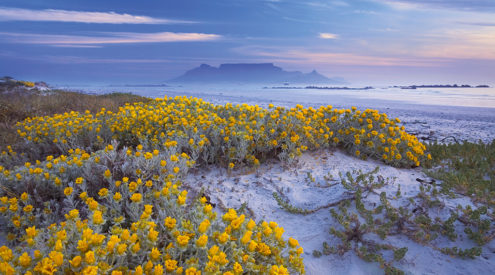


Take your golden-hour shots from ordinary to extraordinary. Contributing photographer Andreas Eiselen tells you how, using this stunning image by Hougaard Malan.
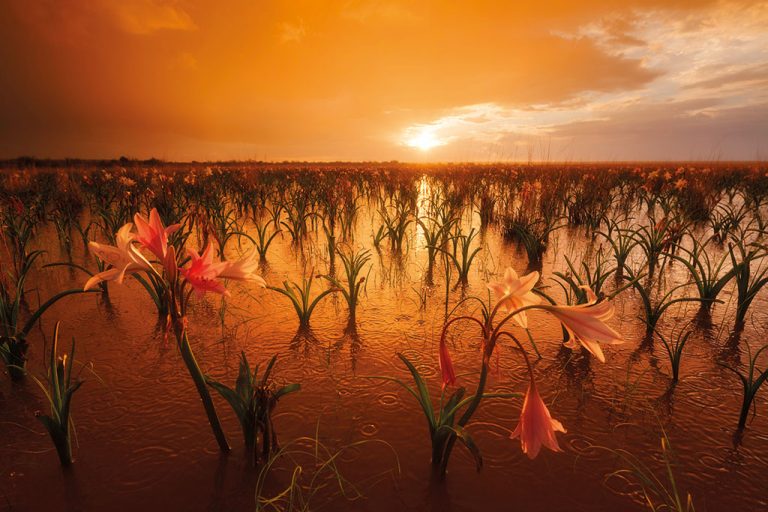
Equipment settings: Canon 5D Mark II, Canon 16-35mm f/2.8, ISO 200, f/8, 1/125 sec. Image credit: Hougaard Malan
Hougaard says…
This lily pan is at Sandhof, a farm just north of the small town of Maltahöhe in southern Namibia. They flower most years, just after the first rains (usually late January) and the pan fills with water.
As the sun dropped towards the horizon, it broke through a gap in the clouds and painted the scene a beautiful orange. There was a breeze and I didn’t want the lilies to blur, so I opened the aperture up and increased my ISO for a faster shutter speed. It was raining and this break of colour happened suddenly, so I didn’t have time to use a graduated filter, which I highly recommend for landscapes. Instead, I bracketed exposures and blended them manually afterwards.
Take it yourself
Use these tips to make your sunset photos rise above the rest
Equipment
DSLR A wide-angle lens (16-35mm, 17-40mm) is best. Use a tripod, shutter-release cable and a graduated neutral density filter for top results. Compact Switch to landscape mode for a more dynamic range to combat high-contrast scenes.
Settings
Set your camera on a tripod. Use manual mode and an aperture of f/8 or more to maintain sharpness throughout your image. If there’s movement in your scene – such as in Hougaard’s – use a fast shutter speed (1/125 or more) so there is no blur. Balance your exposure by first increasing the ISO and then opening the aperture if absolutely necessary. If there is no movement in your scene, set your ISO as low as possible and compensate for the narrow aperture by opening the shutter for as long as necessary.
Practical
Find the right location before sunset so you can experiment with composition without worrying about fading light. Look for spots near water where you might get an interesting reflection, and subjects (such as these lilies) that will glow in soft light.
Place your subject in the foreground to create more interest in your image and apply the rule of thirds to your horizon line.
Override your autofocus if it’s not picking up your subject (cameras struggle with this in direct sunlight). Set your camera on manual focus and take a few test shots at focal lengths that look sharp to the eye. Zoom in on each of your shots to check which is the sharpest and set your focal length according to that.
Balance contrast by taking an exposure reading from the sky (not the sun directly) and the foreground separately. If the difference between the two is more than three stops, wait until the sun is lower. Alternatively, use graduated filters to mitigate the sky’s brightness without darkening your subject, or bracket three (or more) exposures and blend manually afterwards.
Getaway’s top tips
Starter tip: Make sure your lens is super clean! Dust particles and fingerprints are exaggerated in direct sunlight.
Amateur tip: If you don’t have a shutter-release cable, use your built-in timer to trigger the shot.
Pro tip: For ultra-crisp images, use the mirror lock-up in combination with your shutter-release cable to completely kill any camera shake.
These tips first appeared in the April 2018 issue of Getaway magazine.
Our April issue features 13 campsites in Kruger National Park, a visit to Vietnam’s capital, Welcome Lishivha returns to Knysna one year after the fires and Melanie Van Zyl finds the best of both worlds in Mauritius, plus lots more.