


Astral photography is for those rare creatures who come out when the sun goes down and can focus their cameras without the aid of light. One of these is JON KERRIN, who has mastered the art of star trails. ROBYN DALY sheds some light on how it’s done.

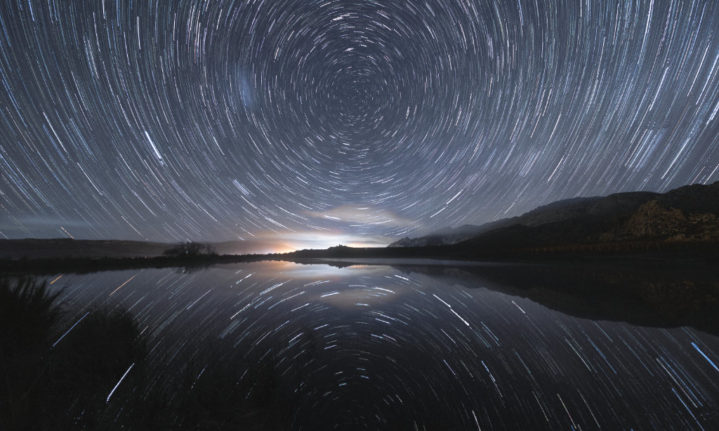
Image credit: Jon Kerrin
About the photograph:
Star-trail Reflections
Jon says, ‘I took this image during one of my astral workshops in the Kouebokkeveld in the southern Cederberg. Aside from making a pleasing composition, the water reflects the light of the stars, which helps to increase the dynamic range and add light to the foreground. This is a stacked image of 70 frames.’
Equipment: Fuji XT3, 8-16mm f2.8 lens, ISO 2500, f/2.8, 20 sec
Take it yourself
Equipment
You can photograph star trails using any camera that allows you to shoot on manual mode. Ideally you want a wide-angle lens with an aperture of f/4 or wider to let in as much light as possible, and to capture the enormity of the sky. Don’t use filters. A sturdy tripod is essential. Choose a tall one so that you don’t have to extend the centre column to get up high. Extending the centre-column increases the chance of camera shake. Jon uses a Gitzo Traveller which is fairly light to carry, yet sturdy. Make sure your battery is fully charged.
When To Shoot
For astral photography you want minimal to no cloud cover. Winter nights generally give the best crisp, clear skies (depending on where you are in the country). When it’s cold, watch for condensation on your lens, which usually happens between three and five in the morning. If you’re shooting the Milky Way, you want a totally dark sky, but for star trails, a moon can be a blessing as it adds light. However, don’t point the camera at the moon as it will be a bright white blob in your picture; it’s best if it’s behind you, adding an ethereal light to your scene.
Find The Pole
In order to capture the stars turning in that mesmerising circle, you need to find the South Celestial Pole. This is an imaginary point in the southern sky around which all stars appear to turn. Fortunately, there are apps to help you find it: try either The Photographer’s Ephemeris or PhotoPills (both R149,99). While it’s lovely to have the symmetry of the star trail in the centre of the sky, placing the South Celestial Pole off-centre can also create a captivating image.
Composition
This is more challenging in the dark. Jon suggests you change the exposure settings briefly to take a single short exposure to see what’s in the photo, then recompose, shoot and check again. Once you’re happy, revert to the camera settings necessary for capturing the star trail. To focus in the dark, find the brightest star, switch to manual focus and then dial the focus ring until the star appears pin sharp. It’s easier if your camera has manual focus assist and focus peaking.
Stacking & Long Exposure
There are two ways to shoot star trails: stacking multiple images or the traditional way of taking one very long exposure. It’s your choice which to use.
Star Stacking
Take multiple images at set intervals and combine them in post production in Lightroom or Photoshop, merging a stack of them into one.
When To Stack
Because you’re taking many images, you can remove a few. Jon uses the stacking technique when there are other people around who might walk in front of his camera or shine a light while he’s shooting, which would potentially ruin a single long-exposure shot.
Settings
For this technique you need a camera that shoots in RAW and has an interval-timer mode. This allows you to continuously shoot up to 999 images at pre-set intervals – mostly used for time-lapse photography. It’s also great for star trails and self-portraits. Set the exposure time to between 20 and 35 seconds, aperture around f/2.8 to f/4 or as wide as the lens will allow. ISO should be between 1600 and 4000. Make sure that your camera’s long-exposure-noise-reduction function is off. Then set the interval timer to shoot anything between 40 and 70 images (the number is quite subjective; however, you should be shooting for between 30 minutes to an hour to get a good circle in the sky).
Long Exposure
Long exposures can be up to an hour long. They allow you to shoot at lower ISOs, which gives the option of bringing back detail in post production.
When To Shoot Long This is a single image, so the camera records everything that happens in that time frame. This includes aeroplanes flying over or any other unexpected light source such as car lights, which can spoil your circles.
Jon tends to use this technique alone in an isolated area.
Settings: Shoot in RAW and set ISO to anywhere between 100 and 500. Open the aperture to f/4 or wider and expose the image for between 15 minutes and one hour. Turn your camera’s long-exposure-noise-reduction setting on to reduce colour noise. But remember, this works by the camera taking a second, equal-time exposure to measure the noise, then subtracts that noise from your real exposure. So do not turn off your camera until this is completed. If your original exposure was an hour, wait another hour before turning off the camera (which is why fully charged batteries are essential).
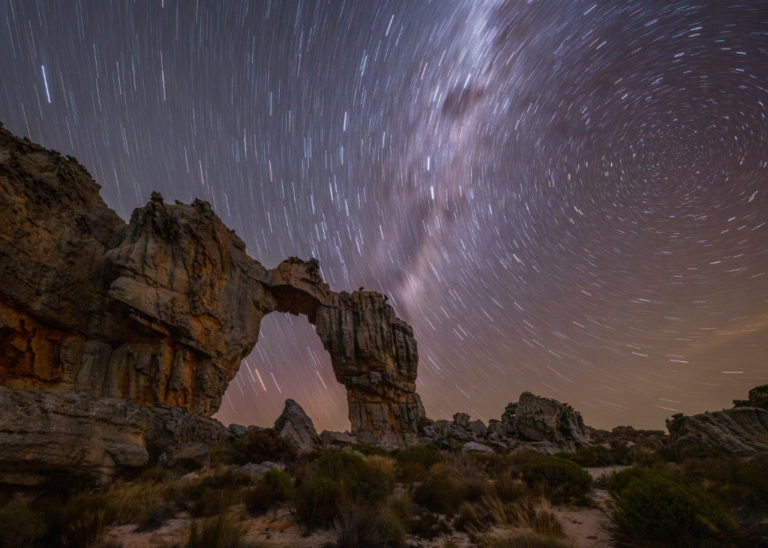
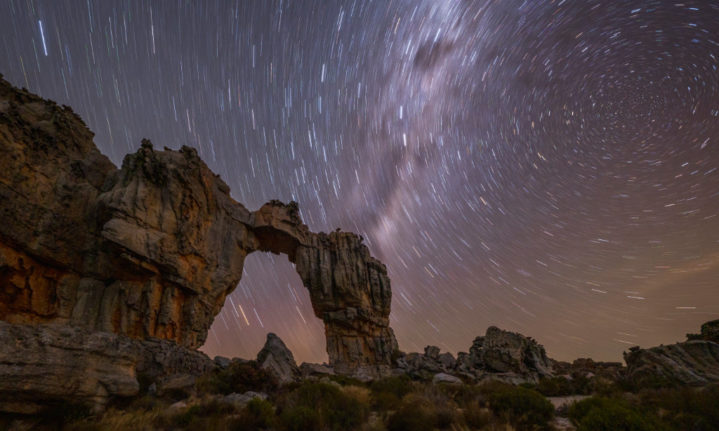
Image credit: Jon Kerrin
About the Photograph
Wolfberg Arch
Jon says, ‘This is a conventional single image taken at Wolfberg Arch in the Cederberg on a long exposure. It was new moon that night, so was very dark and I increased the exposure by two stops in Photoshop to bring out the detail in the rock formation.’
EQUIPMENT: Fuji XT3, 10-24mm lens, ISO 320, f/4, 15 min