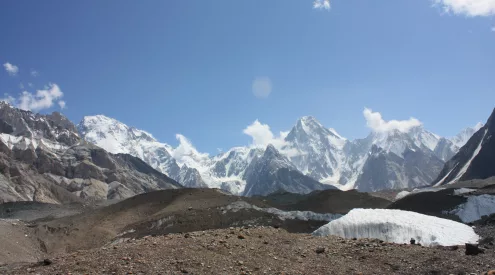

Contributing photographer Andreas Eiselen explains how to shoot all that bright white scenery, using this image of Witsieshoek by Emil von Maltitz.

Equipment: Nikon D3x, Nikkor AFS 24-85mm f/3.5-4.5, ISO 100, f/9, 1/400 sec. Image: Emil von Maltitz
Emil says…
One morning we woke to an incredible winter wonderland with crystal-clear light, untrodden snow, icicles on fence poles and a sea of misty cloud below us. It was a photographer’s dream! Digital cameras make shooting snow extremely easy. With film I was always worried about how the exposure meter would be thrown out by all the white. Underexposing by two-thirds of a stop allowed me to get the bright highlights of the clouds and icicles. The RAW file was quite dark as a result, but because I used ISO 100 I was able to lift the shadows and brighten the image later in post-production without losing detail in the clouds.
Take it yourself
Shooting a snowscape is about controlling the contrast of your scene. Here’s how to avoid grey snow.
Equipment
DSLR Use a wide-angle lens to capture as much of the scene as possible. Use an eyepiece to view image results instead of looking down at the LCD screen, as the glare will make it too bright to see properly. Remember to
acclimatise your camera first. If you jump out of a warm car and whip the camera out of its bag, the lens (and inside of the camera body) will fog. Cool down the camera before shooting by leaving the camera bag outside in the cold for a while first.
Settings
Shoot on RAW to keep as much information as possible for the high-contrast scene. For depth of field, use a small aperture range of f/8 to f/16. With the bright subject matter, the shutter speed will be quite fast so keep the ISO at 100.
Practical
Find your desired frame. Use the rules that make landscapes work (rule of thirds, centre of interest, leading lines etc). Find a strong line of contrast. The camera’s autofocus will struggle to find a point to latch onto in bright glare. Trees or fence posts work well, as the contrast between the snow and object will give it something to focus on.
Take an exposure reading from the snow. Bright white will underexpose if left up to the camera’s light meter, bringing it back closer to neutral grey (see Know Your Stuff on the next page). Compensate for this by slowing down the shutter speed to get correct exposure.
Check your aperture. A smaller aperture helps create good depth of field, but if it’s too small (say, f/22) your image may be less sharp.
Starter tip
Remember to slightly overexpose snow to get it bright white, but don’t overdo it as you can lose detail.
Amateur tip
Use the camera’s spot meter setting (the dot in the menu) to get the exact exposure for the part of the scene you are reading from. Compare the difference in contrast between different parts to calculate the correct exposure.
Pro tip
Use bracketing – slowing down and speeding up shutter speed by a third of a stop either way. These shots can then be combined in post for greater dynamic range.